
Want to know how to make a cat tail costume? It’s easier than you think! With a few simple materials and this easy guide, you can craft a fantastic DIY cat tail that’s perfect for costumes, dress-up, or just plain fun. This cat tail tutorial will show you how to create a delightful homemade cat tail using common craft supplies. Whether you’re aiming for a playful kitten or a sleek panther, a simple cat tail is a fantastic addition to any animal tail costume.
Creating your own cat tail is a rewarding and enjoyable craft. It allows for a personalized touch that store-bought options often lack. You can choose the exact color, length, and fluffiness to match your vision. This guide will walk you through the process step-by-step, making it accessible even for beginners. We’ll cover different material options and techniques to ensure your easy cat tail turns out perfectly. So, gather your supplies and let’s get started on your very own fuzzy cat tail!
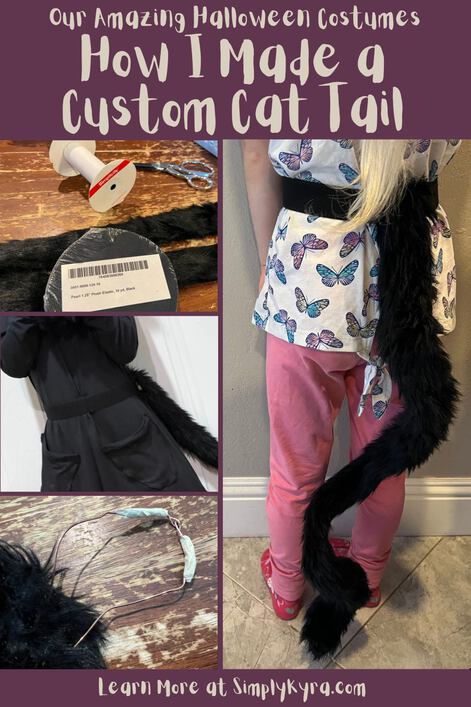
Image Source: www.simplykyra.com
Gathering Your Supplies for a Cat Tail
Before you start, it’s important to have all your materials ready. This makes the crafting process smooth and enjoyable. We’ll explore a few popular methods, but the core supplies often overlap.
Essential Materials for a Basic Cat Tail
- Fabric or Felt: You’ll need a fabric that holds its shape well. Felt is an excellent choice for its ease of cutting and sewing. You can also use fleece, or even an old t-shirt. The amount needed depends on the desired size of your tail. A fat quarter of felt is usually sufficient for a standard tail.
- Stuffing: Poly-fil or cotton batting is perfect for giving your tail its shape and fullness.
- Thread: Choose a thread color that matches your fabric.
- Sewing Needle: A basic sewing needle is all you need if you’re hand-sewing.
- Scissors: Sharp fabric scissors will make cutting your fabric much easier.
- Measuring Tape or Ruler: For accurate measurements.
- Fabric Marker or Chalk: To draw your tail shape onto the fabric.
- Belt or Elastic Band: This is how you’ll attach the tail to your clothing.
Optional but Helpful Materials
- Wire: A flexible wire, like a pipe cleaner cat tail wire or floral wire, can be inserted into the tail to make it posable.
- Glue Gun and Glue Sticks: For quicker assembly or attaching decorative elements.
- Pins: To hold fabric pieces together while sewing.
- Sewing Machine: If you have one, it can speed up the sewing process.
- Decorative Elements: Ribbons, faux fur trim, or paint can add extra flair.
Method 1: The Simple Sewn Fabric Cat Tail
This is a classic method that yields a durable and shapely tail. It’s a great starting point for anyone new to sewing.
Step 1: Designing Your Cat Tail Shape
First, decide on the shape and size of your tail. Do you want a long, slender tail, or a short, stubby one?
- Sketch it out: Draw your desired tail shape on a piece of paper. A simple curve is common, but you can get creative!
- Consider the seam allowance: Remember to add about 1/2 inch around your drawn shape for the seam allowance.
- Cut out your paper pattern: This will be your guide for cutting the fabric.
Step 2: Cutting the Fabric
Lay your chosen fabric flat and place your paper pattern on top.
- Trace the pattern: Use your fabric marker or chalk to trace the pattern onto the fabric.
- Cut two identical pieces: You need two identical shapes for the front and back of the tail. Ensure your cuts are as precise as possible.
Step 3: Sewing the Tail
Now it’s time to bring your tail to life!
- Pin the pieces together: Place the two fabric pieces right sides together (the sides you want showing on the outside should be facing each other). Pin them securely around the edges, leaving a small opening at the base for stuffing and attaching the belt.
- Sew the seam: Using your sewing needle and thread (or sewing machine), stitch around the edges of the tail, following your traced line. Remember that 1/2 inch seam allowance you added.
- Clip the curves: If your tail design has any curves, carefully snip small notches into the seam allowance. This helps the fabric lay smoothly when turned right side out. Be careful not to cut through your stitching.
Step 4: Turning and Stuffing
This is where your tail starts to take shape!
- Turn right side out: Reach through the opening you left at the base and gently pull the fabric through. Use a dull pencil or chopstick to push out any corners or curves.
- Add stuffing: Begin to stuff the tail with your poly-fil or batting. Start from the tip and work your way down. Stuff it firmly enough to give it shape but not so tight that it becomes stiff.
- Insert the belt/elastic: Before you close the opening, you need to attach your belt or elastic band.
- For a belt loop: Fold the raw edges of the opening inward and sew the belt onto the inside of the opening. You can sew a loop of fabric to create a channel for a separate belt.
- For elastic: Cut a piece of elastic long enough to go around your waist comfortably. Thread it through the opening at the base. You can either tie it securely or sew the ends of the elastic to the fabric opening, then close the opening.
Step 5: Closing the Opening
Carefully sew the opening closed.
- Hand stitch: Use a ladder stitch (or blind stitch) for an invisible finish. Fold the raw edges inward and stitch them together neatly.
- Machine stitch: If the opening is small, you can often close it with a close machine stitch.
Method 2: The Quick and Easy Felt Cat Tail
Felt is fantastic for quick crafts because it doesn’t fray, making it ideal for simple projects. This method is even simpler than the sewn version.
Step 1: Cutting Your Felt Pieces
- Tail Shape: Cut out two identical tail shapes from felt, just like in Method 1. You don’t need to add a seam allowance if you’re using a glue gun, but it can give you more surface area for adhesion.
- Attaching Mechanism: Cut a strip of felt or use a sturdy ribbon for the attachment.
Step 2: Assembling with a Glue Gun
This is where the magic happens fast!
- Layering: Place one felt tail piece flat. If you want a posable tail, insert a piece of wire or a few pipe cleaners down the center.
- Adhering the sides: Apply a line of hot glue along the edge of one tail piece. Carefully press the second tail piece onto it, sandwiching the wire (if used) and ensuring the edges align. Work in small sections to prevent the glue from cooling too quickly.
- Stuffing (Optional but Recommended): If you want a plump tail, add a bit of stuffing before sealing the entire edge. You might need to use a pencil to push it in.
- Attaching the belt/ribbon: Glue one end of your belt strip or ribbon to the base of the tail. Make sure it’s securely attached. You might want to add a few extra dabs of glue for strength.
Step 3: Finishing Touches
- Reinforce the base: Add extra glue around the base where the belt/ribbon is attached for durability.
- Decorate: Feel free to add stripes with another color of felt, glue on a small felt “tuft” at the end, or even attach some faux fur trim.
Method 3: The Fuzzy Pipe Cleaner Cat Tail
This is a super simple and fun method, perfect for younger crafters or for a more whimsical look.
Step 1: Preparing the Pipe Cleaners
- Choose your colors: Select pipe cleaners in your desired cat tail color(s).
- Twisting: Take two or three pipe cleaners and twist them together at one end. This provides a good base for adding more.
Step 2: Building the Tail Length
- Adding more: Continue adding more pipe cleaners, twisting them around the base of the previous ones to build length and thickness.
- Shaping: As you add pipe cleaners, you can gently bend and shape the tail into a curve.
- Creating fuzziness: To make it look more like a fuzzy cat tail, you can wrap additional pipe cleaners around the core structure. You can also experiment with different twisting techniques to create a more textured look.
Step 3: Attaching to Your Costume
- Safety Pin: The simplest way to attach a pipe cleaner tail is with a safety pin.
- Belt Loop: You can create a loop at the base of the pipe cleaner structure and thread a ribbon or elastic through it, then tie it onto your belt or waist.
Posable Tails: Adding Wire for Movement
If you want your cat tail to have a bit of bounce and be posable, adding wire is a great idea.
What Kind of Wire to Use
- Floral Wire: Available at craft stores, it’s relatively stiff but can be bent.
- Craft Wire: Similar to floral wire, often found in various gauges.
- Heavy-Duty Pipe Cleaners: Using several sturdy pipe cleaners twisted together can also provide some posability.
- Coat Hanger Wire (with caution): While strong, this wire is harder to work with and can be sharp. If you use it, ensure it’s completely encased in fabric and stuffing.
How to Insert the Wire
- Measure and Cut: Cut a piece of wire that is slightly shorter than your finished tail length. This ensures the wire doesn’t poke out the end.
- Insert during stuffing: If you are sewing your tail, insert the wire after you’ve turned the fabric right side out but before you’ve fully stuffed it.
- Center the wire: Place the wire in the center of the tail cavity.
- Stuff around the wire: Carefully add stuffing around the wire, ensuring it’s evenly distributed. The stuffing will help to cushion the wire and keep it in place.
- Close the tail: Continue with the stuffing and close the opening as described in the previous methods.
Attaching Your Cat Tail
The way you attach your tail is crucial for comfort and security.
Belt Loop Method
- Create a loop: Cut a strip of fabric about 2-3 inches long and 1 inch wide. Fold it in half lengthwise, then fold the raw edges inwards and stitch it closed to create a narrow tube. You can also just fold a strip and serge the edges if you have a serger.
- Sew to the tail: Attach this fabric loop to the base of your finished tail, either on the inside or outside depending on your preference and how you want it to hang.
- Thread a belt: You can then thread a separate belt through this loop.
Elastic Band Method
- Measure and cut elastic: Cut a piece of elastic that comfortably fits around your waist.
- Attach to the tail: You can sew the elastic directly to the opening of the tail before closing it, or attach it to the fabric loop described above.
- Wear: This turns your tail into a wearable accessory that stays put.
Safety Pin Method (for lighter tails like pipe cleaner ones)
- Pin securely: Use a sturdy safety pin to attach the tail directly to your waistband or the back of your pants/skirt.
- Placement: Pin it in a way that allows the tail to hang naturally.
Customizing Your Cat Tail
Now for the fun part – making your tail unique!
Adding Stripes and Patterns
- Felt cut-outs: Cut out shapes from contrasting felt colors (e.g., black stripes on a grey tail) and glue or sew them onto your finished tail.
- Fabric paint: Use fabric paints to draw stripes, spots, or other patterns. Let it dry completely according to the paint’s instructions.
Creating a Fuzzy Texture
- Faux fur: Glue or sew a strip of faux fur trim to the tip of your tail for an extra luxurious feel.
- Yarn: Wrap yarn around the tail, or cut short pieces of yarn and glue them in clusters to create a shaggier look.
- Pipe Cleaner Texture: As mentioned in Method 3, wrapping pipe cleaners in different ways can create a fuzzy effect.
Tail Tips and Tufts
- Felt tuft: Cut a small cluster of felt pieces into a pointy shape and glue it to the very tip of your tail.
- Pom-pom: Attach a small yarn pom-pom or a faux fur pom-pom to the end.
Tips for Making a Great Cat Tail
- Consider the weight: If you plan on moving a lot, a lighter tail is better. Overly heavy tails can pull on your clothing.
- Durability: For a tail that will be used often, reinforcing the seams and attachment points is essential.
- Comfort: Make sure the attachment method is comfortable to wear for extended periods.
- Proportions: Think about the scale of your tail relative to your body. A giant tail might be amusing, but a more proportional one can look more realistic.
- Safety: If using wire, ensure it’s well-covered and doesn’t have sharp ends exposed.
Frequently Asked Questions about Cat Tail Costumes
Q1: What is the easiest way to make a cat tail?
A1: The easiest method is often using felt and a hot glue gun, as it requires minimal sewing and dries quickly. The pipe cleaner method is also very simple and requires no sewing.
Q2: Can I make a cat tail without sewing?
A2: Yes! The hot glue gun and felt method, or the pipe cleaner method, are excellent no-sew options for creating a cat tail.
Q3: How do I make a fuzzy cat tail?
A3: To achieve a fuzzy look, you can use fleece fabric, wrap yarn around the tail, or attach faux fur trim to the end. Experimenting with different pipe cleaner wrapping techniques can also create a fuzzy texture.
Q4: How do I make a posable cat tail?
A4: Insert a piece of flexible wire (like floral wire or craft wire) into the tail cavity before stuffing and sewing it shut. This allows you to bend and shape the tail as desired.
Q5: What materials can I use for a homemade cat tail?
A5: You can use a variety of materials, including felt, fleece, fabric scraps, yarn, and pipe cleaners. Stuffing like poly-fil or cotton batting is needed for fullness.
Q6: How do I attach a cat tail to my pants?
A6: The most common methods are creating a fabric loop at the base of the tail and threading a belt through it, or attaching a piece of elastic to the tail so it can be worn like a belt. A safety pin is also a quick option for lighter tails.
Q7: What is the best fabric for a cat tail costume?
A7: Felt is popular due to its ease of use and lack of fraying. Fleece is also a good choice for a soft, slightly stretchy tail. Any fabric that can be easily cut and sewn or glued can work.
Crafting your own DIY cat tail is a fun and accessible project. Whether you choose a sewn fabric cat tail, a quick felt cat tail, or a whimsical pipe cleaner cat tail, the result will be a unique and charming addition to your animal tail costume. This cat tail tutorial provides the basic steps for creating a fantastic homemade cat tail. With a little creativity, you can make an easy cat tail that’s as individual as you are, adding a playful flick to your feline persona! Enjoy your new tail!