
Thinking about making your own cat tail for a costume? Yes, you absolutely can! Crafting a homemade cat tail is a fun and rewarding project, perfect for costumes, cosplay, or just a bit of playful dress-up. This DIY cat tail tutorial will guide you through making a fantastic fabric cat tail that’s sure to impress, whether you prefer to sew a cat tail or opt for a no sew cat tail method. Get ready to create a fabulous animal tail costume that’s as unique as your feline alter ego!
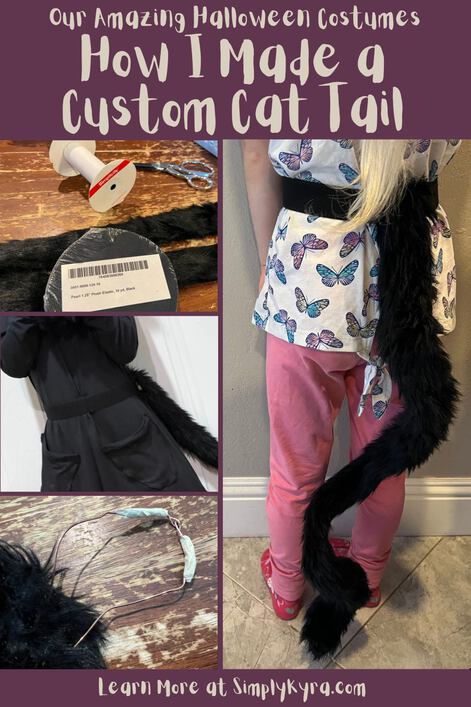
Image Source: www.simplykyra.com
Why Make Your Own Cat Tail?
Store-bought costume accessories can be pricey, and they often lack the personal touch. Creating your own cat tail costume allows for complete customization. You get to choose the exact fabric, length, and fullness, ensuring it perfectly matches your vision. Whether you’re aiming for a sleek, sophisticated look or a wild, fluffy cat tail, making it yourself gives you control over every detail. Plus, the satisfaction of wearing something you’ve handcrafted is immense! This guide focuses on making it simple and accessible for everyone, regardless of sewing experience.
Choosing Your Cat Tail Style
Before we dive into the steps, let’s consider the kind of cat tail you want. This will influence your material choices and construction methods.
Factors to Consider:
- Feline Breed: Are you going for a playful kitten tail, a majestic lion’s tail, or a sleek panther’s tail?
- Desired Movement: Do you want a tail that sways gently or one that has more structure and bounces?
- Fluffiness Factor: A little bit of fluff or a lot? This impacts how much stuffing you’ll need.
- Attachment Method: How will you wear your tail? Belt loops, a safety pin, or a waistband?
Gathering Your Materials
No matter which method you choose, you’ll need a few basic supplies.
Essential Supplies for Any Cat Tail:
- Fabric: The core of your tail!
- Stuffing: To give your tail shape and volume.
- Thread: To match your fabric or for a contrasting effect.
- Scissors: Sharp fabric scissors are best.
- Measuring Tape: For accurate sizing.
- Stuffing Tool: A chopstick or a stuffing tool works well.
Fabric Options:
The fabric you select is crucial for achieving the desired look and feel of your furry cat tail or sleek design.
| Fabric Type | Best For | Pros | Cons |
|---|---|---|---|
| Felt | Simple, rigid tails, accents | Easy to cut, doesn’t fray | Can look a bit stiff, less realistic texture |
| Fleece | Soft, cuddly tails, excellent for fluffy cat tail | Very soft, stretchy, easy to work with | Can pill over time, may shed slightly |
| Faux Fur | Realistic furry cat tail, luxurious feel | Highly textured, soft, eye-catching | Can be tricky to sew, may shed, requires careful cutting |
| Satin/Velvet | Sleek, elegant tails, good for specific breeds | Smooth, luxurious finish | Can be slippery to sew, may snag easily, shows wear and tear |
| Cotton/Poly Cotton | Versatile, good for patterned tails | Easy to sew, widely available | Less inherent texture, might need interfacing for structure |
Stuffing Options:
- Polyester Fiberfill: The most common and affordable stuffing. It’s soft, washable, and readily available at craft stores.
- Cotton Batting: Can provide a firmer fill if you want a more structured tail.
- Scrap Fabric: Smaller fabric scraps can be used for stuffing, especially if you’re trying to reduce waste.
Tools for Sewing vs. No-Sew:
For Sewing:
- Sewing machine (optional, but speeds up the process)
- Sewing needles
- Pins
For No-Sew:
- Fabric glue (strong, flexible fabric glue is best)
- Fabric tape (optional, for reinforcing seams)
Designing Your Cat Tail Pattern
Creating a cat tail pattern is the first step to ensuring your tail has the right shape and size.
Simple Tail Pattern:
- Draw a Long, Tapered Shape: On a piece of paper or directly on your fabric, draw a long, slightly curved shape that is wider at the base and tapers to a point at the tip. Think of a banana shape, but more elongated and sleek.
- Consider Length: The ideal length often corresponds to the wearer’s height, reaching roughly from the waist to the knee or slightly longer. You can adjust this to your preference.
- Add Seam Allowance: If you plan to sew, add about ½ inch (1.25 cm) all around the pattern for your seam allowance. If you’re using fabric glue, you might not need as much, or you can fold the edges inward.
- Make Two Halves: Your tail will consist of two identical mirrored pieces.
Example Tail Pattern Dimensions (Adjust as needed):
- Base Width: 3-4 inches (7.5-10 cm)
- Tip Width: 0.5-1 inch (1.25-2.5 cm)
- Length: 20-30 inches (50-75 cm)
Adding Detail: The Tip
For a more realistic animal tail costume, consider how you want the tip to look.
- Simple Point: Just taper the fabric to a point.
- Tuffed Tip: Leave the tip slightly wider and stuff it more densely, or sew a small circle of contrasting fabric to the end.
- Bobbed Tail: Create a shorter, thicker tail with a rounded end.
Method 1: The Sewn Cat Tail Tutorial
This method offers durability and a clean finish, ideal for a sturdy cosplay cat tail.
Step-by-Step Sewing Guide:
- Prepare Your Fabric: Lay your chosen fabric flat. If you are using faux fur, pay attention to the direction of the fur pile. You want the pile to flow downwards towards the tip of the tail.
- Cut Out Your Pattern: Pin your cat tail pattern to the fabric and carefully cut out two identical pieces.
- Faux Fur Tip: If using faux fur, cut only the backing material, trying to avoid cutting the fur itself. This helps prevent excessive shedding.
- Pin the Pieces: Place the two fabric pieces right sides together, aligning all edges. Pin them securely in place, especially around the curves.
- Sew the Seam:
- Sewing Machine: Using a medium stitch length, sew along the pinned edge, leaving the base open. Remember your seam allowance. For faux fur, you might want to use a longer stitch length and a walking foot if you have one, to help feed the thick fabric evenly.
- Hand Sewing: Use a strong backstitch for a durable seam.
- Reinforce Corners (Optional): If you have sharp curves or a pointed tip, you can clip small notches into the seam allowance (without cutting the stitching) to help it lay flat when turned.
- Turn Right Side Out: Carefully turn the tail right side out through the open base. Use a stuffing tool or a blunt object to gently push out the curves and ensure the tip is well-formed.
- Stuff the Tail: Begin stuffing the tail with your chosen filling. Start from the tip and work your way towards the base. Pack the stuffing firmly but not so tightly that the tail becomes rigid. You want a natural, flexible movement. Add stuffing gradually, checking the fullness as you go.
- Close the Base: Once you’re happy with the stuffing, fold the raw edges of the open base inward by about ½ inch (1.25 cm) and pin them together.
- Hand Sew: Use a ladder stitch (invisible stitch) for a neat finish that hides the seam.
- Machine Sew: You can carefully topstitch the opening closed, or fold the edges and stitch them shut.
Attaching the Tail:
- Belt Loops: Sew sturdy fabric loops onto the base of the tail. These can then be threaded onto a belt or elastic waistband.
- Safety Pin: For a quick and easy attachment, you can sew a strong safety pin securely to the base of the tail.
- Waistband: Sew the tail directly onto a separate elastic waistband that you can wear around your hips.
Method 2: The No-Sew Cat Tail Tutorial
This method is fantastic for beginners or when you need a tail quickly. It’s a great way to create a fluffy cat tail without any sewing machine hassle.
Step-by-Step No-Sew Guide:
- Prepare Your Fabric: Lay your fabric flat.
- Cut Out Your Pattern: Cut two identical tail shapes from your fabric, as described in the pattern section. For a no-sew approach, you might want to add a slightly larger allowance for folding or gluing.
- Apply Fabric Glue: Lay one fabric piece flat, wrong side up. Along the edges of the tail shape, apply a generous line of fabric glue, leaving the base open.
- Faux Fur Tip: For faux fur, apply glue to the fabric backing, trying to keep the fur out of the glue line.
- Join the Pieces: Carefully place the second fabric piece on top of the glued piece, right sides together (so the glue is on the inside). Press the edges firmly to ensure good adhesion. If you are using fabric tape for extra strength, you can add it along the glued seam.
- Let it Dry: Allow the fabric glue to dry completely according to the manufacturer’s instructions. This is crucial for the tail’s durability.
- Turn and Stuff: Once the glue is dry, carefully turn the tail right side out through the open base. Begin stuffing the tail, starting from the tip, until it reaches your desired fullness. Use a stuffing tool to push the filling into all the nooks and crannies.
- Close the Base: Fold the raw edges of the open base inward by about ½ inch (1.25 cm). Apply a strong line of fabric glue along the folded edges and press them firmly together. You can use fabric tape to hold it in place while the glue dries if needed.
Attaching the Tail (No-Sew Options):
- Fabric Glue to Belt/Waistband: You can directly glue the base of your finished tail to a belt or a separate piece of elastic. Ensure the glue is strong enough to hold the weight of the tail.
- Safety Pin: As with the sewn method, securely attach a large safety pin to the base.
Enhancing Your Cat Tail: Adding Flair
Once you have the basic tail structure, you can elevate it with some extra details.
Making it Fluffy or Furry:
- Faux Fur: This is your best friend for a furry cat tail. Choose a fur with a nice pile and density. For extra fluff, you can use more stuffing or even lightly tease the fur with a comb.
- Fleece: Fleece can be made fluffier by gently brushing the outer surface with a wire brush or comb. Be gentle to avoid damaging the fabric.
- Adding Accents: Sew or glue on strips of contrasting faux fur to the tip or along the length of the tail for a unique look.
Adding a Tail Tip Detail:
- Contrast Fabric: Sew or glue a small circle or triangle of a different colored fabric to the very end of the tail.
- Faux Fur Puff: Cut a small circle of faux fur and gather it with a needle and thread, then attach it to the tail tip.
- Embroidery: If you’re comfortable with embroidery, you can add decorative stitches or even a simple pattern to the tail.
Creating a Curvy or Posable Tail:
For a tail that has a bit more character and can be posed, consider these options:
- Wire Inserts: Before stuffing, carefully insert a flexible but sturdy wire (like a coat hanger wire or craft wire) into the center of the tail. Make sure to cover the ends of the wire with tape to prevent them from poking through the fabric. This allows you to bend and shape the tail.
- Curved Pattern: Design your cat tail pattern with a more pronounced curve to naturally create a sinuous shape.
Caring for Your Costume Cat Tail
To keep your animal tail costume looking its best, follow these simple care tips:
- Spot Clean: For minor dirt or dust, gently spot clean with a damp cloth and mild soap. Avoid soaking the tail, especially if it’s stuffed with fiberfill.
- Gentle Washing: If your tail is made from durable materials like fleece or cotton and you’ve used washable stuffing, you might be able to hand wash it in cool water with a gentle detergent. Lay it flat to air dry.
- Faux Fur Care: For faux fur tails, avoid machine washing or drying, as this can damage the fur. If it gets matted, try gently brushing it with a wide-toothed comb or a pet brush.
- Storage: Store your tail away from direct sunlight and extreme temperatures to prevent fading or damage to the fabric.
Frequently Asked Questions About Making a Cat Tail
Q1: Can I make a cat tail without any sewing skills?
A1: Absolutely! The no-sew method using fabric glue is a fantastic option for those who don’t sew.
Q2: What is the best fabric for a fluffy cat tail?
A2: Faux fur is the ideal choice for a truly fluffy cat tail. Fleece is also a good option and can be made to look fluffier with brushing.
Q3: How do I attach the cat tail so it stays on?
A3: Secure attachment methods include sewing on sturdy belt loops, using a strong safety pin, or sewing the tail directly onto a waistband. Ensure your chosen method can handle the movement of the tail.
Q4: Can I make the tail posable so it holds a shape?
A4: Yes, you can insert a flexible wire into the center of the tail before stuffing it. Just be sure to tape the wire ends to prevent them from snagging or poking.
Q5: How do I avoid shedding when working with faux fur?
A5: When cutting faux fur, try to cut only the backing fabric, not the fur itself. Use sharp scissors and work slowly. You can also use a lint roller or a vacuum cleaner to clean up loose fibers after cutting and sewing.
Creating your own cat tail costume is a wonderfully creative endeavor. Whether you follow this DIY cat tail tutorial for a sewn masterpiece or opt for the quick and easy no-sew approach, you’re sure to end up with a fantastic homemade cat tail that adds a purr-fect touch to any costume! Happy crafting!