
Can you collect a cat urine sample at home? Yes, you can! This guide will walk you through simple at-home methods for obtaining a cat urine sample for your veterinarian. Collecting a urine sample from a cat can seem daunting, but with the right approach and a bit of patience, it’s entirely achievable. Whether your vet needs a sample for a routine check-up or a specific diagnostic test, like a cat UTI sample, knowing how to get a urine sample from a cat at home can save you time, money, and stress for both you and your feline friend. This article will cover everything you need to know about cat urine sample collection and how to make it as stress-free as possible.
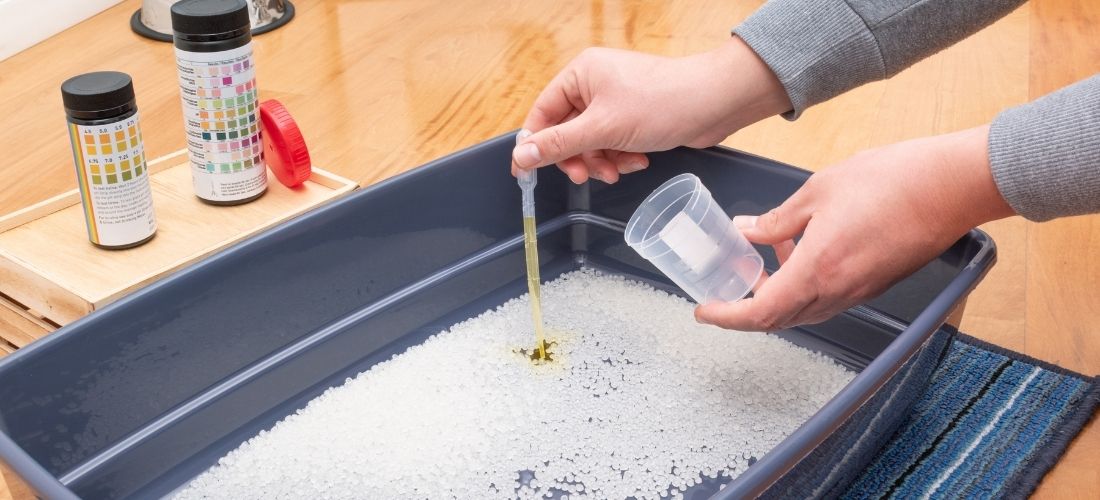
Image Source: www.pdsa.org.uk
Why Your Vet Needs a Cat Urine Sample
A cat urine test is a crucial diagnostic tool for veterinarians. It provides a wealth of information about your cat’s health, revealing potential issues that might not be apparent from a physical examination alone. Urine analysis can help diagnose a wide range of conditions, including:
- Urinary Tract Infections (UTIs): Detecting bacteria, white blood cells, and other signs of infection. This is often why a cat UTI sample is specifically requested.
- Kidney Disease: Assessing kidney function by looking at specific gravity, protein levels, and the presence of crystals or casts.
- Diabetes Mellitus: Identifying glucose and ketones in the urine, indicators of uncontrolled blood sugar.
- Liver Disease: Observing changes in bilirubin levels.
- Bladder Stones or Crystals: Recognizing the presence of mineral crystals that can lead to painful blockages.
- Dehydration: Evaluating the concentration of the urine.
- Other Metabolic Disorders: Such as hyperthyroidism or Cushing’s disease.
The information gleaned from a veterinary urine sample is invaluable for making accurate diagnoses and tailoring treatment plans.
Preparing for Cat Urine Sample Collection
Before you embark on the mission of obtaining a urine sample from a cat, thorough preparation is key. This ensures you have the necessary supplies and a clear plan, increasing your chances of success and minimizing stress for your cat.
Essential Supplies for At-Home Cat Urine Collection
Having the right tools at hand makes the process much smoother. Here’s a checklist of what you’ll likely need for at-home cat urine collection:
- A Clean Collection Container: This is paramount. Your vet will likely provide a sterile container or suggest a specific type. If not, a clean, dry plastic or glass container with a secure lid works. Avoid using anything that has previously contained chemicals or soap.
- A Non-Absorbent Litter Substitute: This is the secret weapon for many cat owners. Standard clumping or clay litter will absorb the urine, making collection impossible. Instead, you’ll need a non-absorbent material. Popular options include:
- Specialized Non-Absorbent Litter Pellets: Many pet stores sell specific products designed for cat urine sample collection. These are typically plastic or polymer beads.
- Clean Plastic Beads: Similar to the specialized litter, these are designed not to absorb liquid.
- Small Plastic Balls or Marbles: Ensure they are thoroughly cleaned and dried.
- A Clean Shallow Tray or Pan: This will be placed under your cat if they are prone to urinating outside the litter box.
- Gloves: Disposable gloves are recommended to maintain hygiene.
- Pipette or Syringe (without needle): Once you’ve collected the urine in your substitute litter, you’ll need a way to transfer it to the sterile container. A clean pipette or a syringe with the needle removed is ideal for drawing up the urine.
- A Calm and Quiet Environment: Choose a time when your cat is likely to urinate and when the household is relatively peaceful. Minimize distractions, loud noises, and the presence of other pets or people.
- Treats and Positive Reinforcement: Have some of your cat’s favorite treats ready to reward them for their cooperation.
When to Collect the Sample
The best time to collect a cat urine sample is typically first thing in the morning. This is often when the urine is most concentrated, providing the clearest diagnostic picture for your vet. If your cat has a tendency to hold their urine overnight, this is your best opportunity.
Communicating with Your Veterinarian
Always discuss your plan with your veterinarian before you begin. They can provide specific instructions tailored to your cat’s needs and the tests they are performing. They can advise on the best type of collection container and any specific preparations. For instance, if your vet suspects a urinary tract infection, they might be particularly interested in a fresh sample to identify bacteria.
Methods for Obtaining Cat Urine
There are several effective methods for obtaining cat urine at home, ranging from the most common to slightly more advanced techniques.
Method 1: The Non-Absorbent Litter Technique
This is often the most successful and least invasive method for at-home cat urine collection.
Steps:
- Clean the Litter Box: Thoroughly clean your cat’s litter box. Remove all old litter and wash the box with mild soap and water. Rinse it extremely well and dry it completely. Any residue can interfere with the test results.
- Add the Non-Absorbent Substitute: Pour a layer of your chosen non-absorbent litter substitute (plastic beads, clean marbles, or specialized pellets) into the clean, dry litter box. Aim for a depth of about 1-2 inches.
- Place the Litter Box: Position the litter box in its usual spot, or in a quiet, familiar location where your cat feels secure.
- Wait for Your Cat: Be patient. Your cat might not use the substitute litter immediately. If they seem hesitant, you can try placing a small amount of their usual, familiar litter on top of the substitute for a short period to encourage them. Once they use it, remove the familiar litter as soon as possible.
- Collection: Once your cat urinates on the non-absorbent material, you’ll see the urine pool on the surface or between the beads/pellets.
- Transfer the Urine: Using a clean pipette or syringe (with the needle removed), carefully draw up the urine. Try to collect it from the cleanest part of the pool, avoiding any fecal matter or hair.
- Deposit into the Collection Container: Transfer the collected urine into the sterile, leak-proof container provided by your veterinarian. Fill it to the recommended level, usually about half to two-thirds full.
- Secure and Label: Screw the lid on tightly. Label the container with your cat’s name, the date, and the time of collection.
- Refrigerate (If Necessary): If you cannot deliver the sample to your vet immediately (within 1-2 hours), store it in the refrigerator. Contact your vet for their specific storage recommendations, as prolonged refrigeration can sometimes affect results.
Pros:
* Relatively easy for most cats to adapt to.
* Less stressful for the cat compared to other methods.
* Provides a good volume of urine in many cases.
Cons:
* Some cats may refuse to use the substitute litter.
* Requires careful cleaning of the litter box.
* May require purchasing specialized litter substitutes.
Method 2: The Direct Collection Technique (Syringe Method)
This method involves directly collecting urine from your cat as they urinate. It requires precision and a good understanding of your cat’s habits.
Steps:
- Prepare Your Supplies: Have a clean, sterile syringe (without a needle) ready. Ensure you have gloves and a clean container for transfer if needed.
- Identify Urination Times: Observe your cat’s behavior. Many cats have predictable urination times, often after waking up or after a meal.
- Approach Calmly: When you suspect your cat is about to urinate, approach them calmly and quietly.
- Position the Syringe: Gently position the opening of the syringe under your cat as they squat to urinate. The goal is to catch the urine mid-stream.
- Collect the Urine: As your cat urinates, the urine will flow into the syringe. Collect at least 1-2 ml, or as much as possible.
- Transfer to Container: Carefully transfer the urine from the syringe into the sterile collection container.
- Secure and Label: Seal the container tightly and label it with your cat’s name, date, and time.
- Refrigerate (If Necessary): Store in the refrigerator if you cannot deliver it promptly.
Pros:
* Can be very effective if you are quick and your cat is predictable.
* Yields a fresh sample.
Cons:
* Extremely difficult for many cats, as they may move or stop urinating when approached.
* Can be stressful for both the cat and the owner.
* Requires a high degree of dexterity and observation.
* May result in only a small amount of urine.
Method 3: The “Accidental” Collection
This involves catching urine if your cat urinates on a hard surface, like a tile floor or a bathroom linoleum.
Steps:
- Preparation: Have a clean, sterile collection container or a small, clean dish ready.
- Observation: If you notice your cat squatting to urinate on a washable surface, quickly place the container or dish underneath them.
- Collection: Collect the urine as it flows.
- Transfer (if using a dish): If you collected it in a dish, use a clean pipette or syringe to transfer the urine into the sterile collection container.
- Secure and Label: Seal the container tightly and label it.
- Refrigerate (If Necessary): Store in the refrigerator if needed.
Pros:
* Requires no prior litter box modification.
* Can be useful if your cat is a “roamer” and doesn’t always use their box.
Cons:
* Highly dependent on luck and quick reflexes.
* The urine might be contaminated with surface residue.
* May yield a small volume.
Method 4: Using a Cat Urine Collection Kit
For owners who want a more streamlined approach, a urine collection kit for cats can be a worthwhile investment. These kits often include specialized non-absorbent litter, a collection container, and sometimes a pipette. Following the specific instructions provided with the kit will ensure the best results.
What to Do if Your Cat Won’t Cooperate
It’s not uncommon for cats to be resistant to collecting feline urine. They are creatures of habit and privacy. If your cat is refusing the non-absorbent litter or you’re finding direct collection impossible, don’t despair. Here are some strategies:
- Patience is Key: Some cats simply need more time to adjust to a new litter material. Leave the non-absorbent litter in the box for a day or two and see if they start to use it.
- Gradual Introduction: If your cat is very particular, you can try a gradual introduction. Start by mixing a very small amount of the non-absorbent litter with their usual litter. Slowly increase the ratio over a few days, always ensuring the majority is the non-absorbent material.
- Minimize Stress: Ensure the litter box environment is calm and safe. Avoid hovering or forcing your cat. A stressed cat is less likely to use the litter box.
- Consider a Second Litter Box: Temporarily set up a second litter box with the non-absorbent material alongside their regular box. This gives them a choice.
- Feliway Diffusers: These can help create a calming environment for anxious cats, potentially making them more receptive to changes.
- Consult Your Vet: If all else fails, your veterinarian can collect the urine sample for you. This might involve a quick in-clinic procedure or, in some cases, hospitalization for a short period to monitor urination. While obtaining cat urine at home is preferable for convenience, your vet has the expertise and tools to get a sample reliably.
Common Mistakes to Avoid During Cat Urine Sample Collection
Even with the best intentions, some common pitfalls can lead to a failed or unusable sample. Being aware of these can help you prevent them.
- Using Absorbent Litter: This is the most frequent mistake. Clumping or clay litter will soak up the urine, making it impossible to collect. Always use a non-absorbent substitute.
- Contaminating the Sample: Avoid getting feces, hair, or excessive debris into the collected urine. This can interfere with diagnostic tests.
- Using Dirty Equipment: Always ensure all collection containers, syringes, and pipettes are clean and, ideally, sterile.
- Not Collecting Enough Urine: Some tests require a minimum volume of urine. Aim to collect at least 1-2 ml. If you are struggling, collect whatever you can and inform your vet.
- Delaying Delivery: Urine can degrade over time, and bacteria can multiply. Deliver the sample to your vet as soon as possible, ideally within 1-2 hours. If refrigeration is necessary, follow your vet’s specific instructions.
- Forcing the Cat: Stressing your cat will likely make them avoid the litter box altogether. Patience and a calm approach are crucial.
- Not Confirming with Your Vet: Always check with your vet about their preferred collection method and container before you start.
Analyzing the Cat Urine Sample: What Your Vet Looks For
Once you’ve successfully collected a cat urine sample, your veterinarian will send it to a laboratory for analysis. Here’s a glimpse into what they’re looking for:
Urinalysis Parameters
A standard urinalysis involves several components:
-
Gross Examination:
- Color: Should be typically yellow. Abnormal colors can indicate issues like blood or certain medications.
- Clarity: Should be clear. Cloudy urine might suggest the presence of cells, crystals, or bacteria.
- Odor: While not a primary diagnostic tool, unusual odors can sometimes be indicative of certain conditions.
-
Chemical Examination (Dipstick Test):
- pH: Indicates the acidity or alkalinity of the urine. Abnormal pH can predispose cats to crystal formation.
- Specific Gravity (SG): Measures urine concentration. A low SG can indicate kidney disease or diabetes, while a very high SG might suggest dehydration.
- Protein: Small amounts of protein are normal, but higher levels can signal kidney damage or inflammation.
- Glucose: Glucose in urine is usually abnormal and can indicate diabetes.
- Ketones: Presence of ketones often points to uncontrolled diabetes.
- Bilirubin: Can indicate liver problems.
- Blood (Hematuria): The presence of red blood cells can signal infection, inflammation, stones, or trauma.
- Nitrites: Usually absent in cat urine; their presence can suggest a bacterial infection.
- Leukocytes: Indicates white blood cells, which are a sign of inflammation or infection.
-
Microscopic Examination:
- Cells: Red blood cells, white blood cells, and epithelial cells are examined.
- Casts: Tube-shaped particles formed in the kidney tubules. Their presence and type can provide clues about kidney health.
- Crystals: Various types of crystals (e.g., struvite, calcium oxalate) can form in the urine. Their presence and type can indicate a predisposition to urinary stones or irritation.
- Bacteria: Identifying bacteria confirms a urinary tract infection.
Culture and Sensitivity Testing
If a bacterial infection is suspected (like in a cat UTI sample), the urine may also be sent for culture and sensitivity testing. This involves growing any bacteria present in the sample and then testing different antibiotics to see which ones are most effective at killing the bacteria.
Frequently Asked Questions (FAQ)
Q1: How much urine do I need to collect?
A1: Your veterinarian will usually specify the amount, but generally, 1-2 milliliters (about 1/4 to 1/2 teaspoon) is sufficient for most basic tests. For more complex analyses, more may be needed.
Q2: Can I use my cat’s regular litter?
A2: No, you cannot use regular clumping or clay litter, as it will absorb the urine and prevent collection. You must use a non-absorbent substitute.
Q3: What if my cat urinates outside the litter box?
A3: If your cat is prone to urinating in other places, you might need to confine them to a bathroom or a specific room where you can easily monitor them and place a collection tray underneath them if they squat.
Q4: How long is the urine sample good for?
A4: It’s best to deliver the sample to your vet within 1-2 hours of collection. If you need to store it, refrigerate it and ask your vet for their specific maximum storage time (usually no more than 24 hours).
Q5: My cat won’t use the special litter. What can I do?
A5: Be patient, try a gradual introduction of the new litter, ensure the environment is stress-free, or consider setting up a second litter box with the special material. If problems persist, your vet can assist.
Q6: Can I use a plastic bag to collect urine?
A6: While technically possible, it’s not ideal. Plastic bags are not sterile and can easily contaminate the sample. It’s best to use the sterile containers provided by your vet or specialized collection kits.
Q7: What is a urine collection kit for cats?
A7: A urine collection kit for cats is a package typically containing non-absorbent litter, a sterile collection container, and sometimes a pipette or syringe, designed to make at-home cat urine collection easier.
Q8: My vet asked for a “mid-stream” sample. What does that mean?
A8: A mid-stream sample means you collect urine after your cat has started urinating, but before they finish. This helps to get a cleaner sample, free from initial contaminants from the urethra. This is often achieved with the direct syringe method or careful collection from the non-absorbent litter.
Q9: Can I freeze the urine sample?
A9: Generally, no. Freezing can alter some components of the urine, making the test results less accurate. Refrigeration is the preferred method for short-term storage. Always confirm with your vet.
Q10: What if I collect feces in the sample?
A10: If you accidentally collect feces along with the urine, try to remove it with a clean pipette or tweezers before transferring the urine to the sterile container. If there is a lot of contamination, it’s best to discard the sample and try again. Inform your vet about any contamination.