
Want to transform into a purrfect feline for a party, Halloween, or just for fun? Learning how to cat face paint is a fantastic skill to have, and it’s surprisingly achievable even for beginners. What’s the best way to start? With the right materials and a simple plan, you can create an adorable easy cat face paint design that will have everyone meowing with delight. This guide will walk you through everything you need to know, from picking out your cat face paint kit to mastering the final touches.
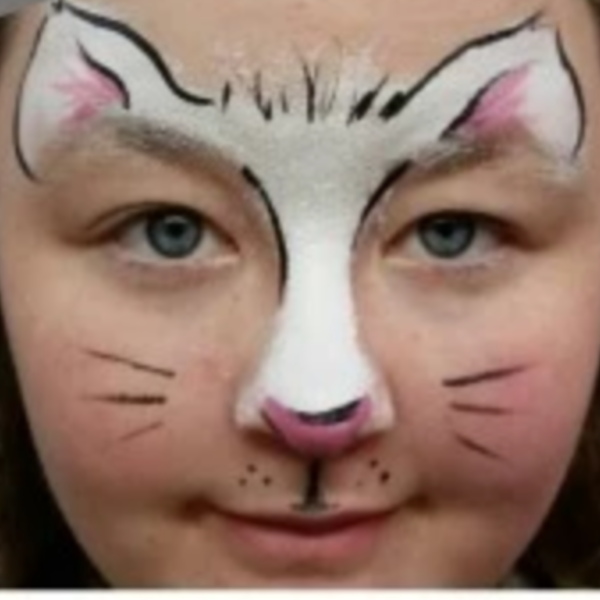
Image Source: facepaint.com
Getting Started: Your Cat Face Painting Toolkit
Before you can paint a masterpiece, you need the right supplies. Think of this as gathering your artist’s palette for a very special canvas – a child’s (or adult’s!) face. Having quality materials makes a huge difference in how easy the process is and how professional the final result looks.
Essential Face Painting Supplies
- Face Paints: This is your primary tool. Look for children’s face paint cat designs or general face paint kits that are specifically formulated for use on skin. These are usually water-based, non-toxic, and hypoallergenic. They come in various forms, including creams, powders, and liquids. For beginners, water-activated cake paints are a great choice because they are easy to control and clean up.
- Brushes: You’ll need a few different sizes.
- Fine-tipped brushes: Ideal for drawing thin lines like whiskers and outlines.
- Medium-sized brushes: Good for filling in larger areas of color and creating smooth transitions.
- Flat brushes: Useful for applying base colors and creating broad strokes.
- Sponges: Small, dense sponges are perfect for applying base colors smoothly and quickly. They help create an even canvas before you start adding details.
- Water Cup: You’ll need clean water to rinse your brushes and thin your paints if necessary.
- Paper Towels or Cloths: For drying brushes and wiping away any mistakes.
- Mirror: Crucial for both the person being painted and the painter to see what’s happening.
- Optional: Glitter: A touch of cosmetic-grade glitter can add a magical sparkle to your cat design.
- Optional: Stencils: While not essential, stencils can be helpful for creating perfect shapes, especially if you’re new to face painting cat tutorial steps.
Choosing Your Cat Face Paint Kit
When selecting a cat face paint kit, look for one that includes a good range of basic colors. Typically, you’ll want black, white, pink, and perhaps a brown or gray. Many kits also come with brushes, making them a convenient all-in-one option for beginner cat face makeup. Ensure the kit is specifically labeled as “skin-safe” or “cosmetic grade.”
Planning Your Cat Design: From Simple to Sophisticated
There are countless animal face painting ideas, but for a cat, the core elements are usually the same: a nose, whiskers, and perhaps some feline-inspired eye makeup. The beauty of a cat face is its versatility; you can go for a cute kitten, a fierce lion, or a sleek black cat.
The Anatomy of a Cat Face Paint Design
A good simple cat face design focuses on a few key features that instantly make it recognizable as a cat. These are:
- The Nose: Usually a small, triangular or rounded shape, often in black or pink, painted on the tip of the nose.
- The Mouth Line: A vertical line extending from the nose down towards the upper lip.
- Whiskers: Delicate lines drawn from the cheeks, extending outward from the mouth area.
- Eyes: Often enhanced with eyeliner-like strokes or simple color accents.
- Ears: These can be painted directly onto the forehead.
Creating a Simple Cat Face Design
For a kids cat face paint activity, simplicity is key. Here’s a breakdown of a very easy design:
- Nose: Paint a small triangle or a rounded shape on the tip of the nose. Black or pink are classic choices.
- Mouth Line: Draw a short, vertical line from the bottom of the nose down to the upper lip.
- Mouth Curves: From the ends of the mouth line, draw two small, curved lines upwards, mimicking a subtle smile or the natural curve of a cat’s mouth.
- Whiskers: Using a fine brush and black or white paint, draw three to five thin lines extending outwards from each side of the mouth, across the cheeks.
- Optional: Ears: Paint two pointed triangles on the forehead, above the eyebrows. You can fill these in with the base color or leave them as outlines.
This simple cat face design is quick to execute and always a hit with younger children.
Advanced Cat Face Makeup Ideas
If you’re feeling more ambitious, you can explore more intricate designs:
- Full Face Transformation: Cover the entire face with a base color (like white for a white cat, or gray for a tabby) and then add darker markings, stripes, or spots.
- Dramatic Eyes: Use darker colors and sharp lines to create a more feline, almond-shaped eye. You can extend the lines outwards and upwards, like an exaggerated cat-eye eyeliner.
- Shading and Highlights: Use lighter and darker shades of your base color to add depth and dimension to the face, making the features pop.
- Textural Elements: Experiment with adding fur-like strokes for a more realistic look.
Step-by-Step: How to Paint a Cat Face
Now, let’s get down to the actual painting. This face painting cat tutorial will guide you through creating a classic and popular cat look. We’ll focus on a design that is suitable for both kids and adults looking for a fun transformation. This is a great guide for beginner cat face makeup.
Step 1: Prepare the Canvas (The Face!)
- Clean Skin: Ensure the face is clean and dry. Remove any makeup or lotions, as these can prevent the face paint from adhering properly.
- Hair Out of the Way: Use a headband or hair clips to keep hair away from the face.
- Test for Sensitivity: If using new paints or painting someone with sensitive skin, do a small patch test on the arm or behind the ear first.
Step 2: Apply the Base Coat (Optional but Recommended)
For a more complete cat look, a base coat can be beneficial, especially if you’re aiming for a white or colored cat.
- Using a Sponge: Dampen your sponge slightly (if using water-activated paints). Pick up a good amount of white or chosen base color paint on the sponge.
- Dabbing Motion: Gently dab the paint onto the skin, working in small sections. Avoid rubbing, as this can create streaks. Build up the color in thin layers for a smooth finish.
- Let it Dry: Allow the base coat to dry completely before moving on. This prevents colors from mixing unintentionally.
Step 3: Painting the Nose and Mouth Area
This is a crucial part of how to paint a cat nose.
- Nose Shape: Using a fine brush and black or pink paint, paint a small, filled-in triangle or rounded shape on the tip of the person’s nose. Make sure the paint goes all the way to the edge of the nostril for a realistic effect.
- Mouth Line: Draw a straight, vertical line from the bottom of the painted nose down to the philtrum (the dip above the upper lip).
- Mouth Curves: From the bottom of this vertical line, draw two small, curved lines outwards and slightly upwards to create the classic cat mouth.
Step 4: Adding Whiskers
Whiskers are what truly define the cat face.
- Fine Brush and Steady Hand: Use your finest brush for this. Load it with black or white paint.
- Drawing the Lines: Start near the sides of the mouth. Draw three to five thin, straight lines extending outwards from the cheek area. Try to make them vary slightly in length and thickness for a natural look.
- Placement: Think about where a cat’s whiskers grow from. They should be positioned symmetrically on both sides of the face.
Step 5: Enhancing the Eyes
This is where you can add personality to your cat.
- Simple Eye Accents: For a simple cat face design, you can simply extend the upper eyeliner slightly outwards and upwards from the outer corner of the eye.
- Kitten Eyes: Draw a curved line above the eyelid, extending slightly outwards, and a small flick at the outer corner.
- Cat-Eye Effect: For a more dramatic look, paint a pointed shape extending from the outer corner of the eye upwards towards the eyebrow. You can also add a small dot or line on the lower eyelid.
- Color Accents: You can add a touch of color to the eyelids or under the eyes to match the base color or provide contrast.
Step 6: Painting the Ears
Ears are typically painted on the forehead.
- Placement: Decide where the ears will sit. Usually, they are placed above the eyebrows, pointing upwards.
- Shape: Draw two pointed triangle shapes. You can fill them in solid or just outline them.
- Detailing: For a more realistic ear, you can add a smaller, lighter colored triangle inside the main ear shape, or draw a few simple strokes to suggest fur.
Step 7: Adding Details and Finishing Touches
This is where your kids cat face paint can really come alive.
- Cheek Blushes: A touch of pink or blush-colored paint dabbed onto the cheeks can add a cute, rosy effect.
- Paw Prints: If you have extra space, you can add a small paw print on the chin or cheeks.
- Glitter: For a magical touch, use a fine brush to apply cosmetic glitter over the painted areas, especially around the eyes or on the ears.
- Review and Refine: Look at the face from different angles. Are there any areas that need touching up? Are the lines crisp?
Tips for a Smooth and Successful Painting Experience
Even with a great face painting cat tutorial, a few extra tips can elevate your game.
Working with Different Face Paints
- Water-Activated Cake Paints: These are the most common. Dip your brush in water, swirl it on the paint cake to pick up color. Too much water makes it runny; too little makes it streaky.
- Cream Paints: These are often applied with a brush or sponge. They can be easier to blend but may require a setting powder for longevity.
- Liquid Paints: Usually used for fine details or airbrushing.
Easy Cleanup
- Water is Your Friend: Most face paints clean up easily with soap and warm water.
- Brush Care: Rinse brushes thoroughly after each color change to prevent muddying.
- Skin Care: After the event, gently wash the face with soap and water. A makeup remover can help with stubborn colors.
Practice Makes Perfect
Don’t be afraid to practice on your own hand, a piece of paper, or a willing friend before the main event. This is especially helpful for mastering how to draw a cat face elements like whiskers and ears. Trying out different animal face painting ideas on yourself first will boost your confidence.
Frequently Asked Questions About Cat Face Painting
Here are some common questions people have when diving into cat face paint.
Q1: What are the best face paints for beginners?
A1: Water-activated cake paints are generally the easiest for beginners. They offer good color payoff, are easy to control, and clean up simply with water. Brands specifically designed for face painting, like Snazaroo or TAG, are excellent choices.
Q2: Can I use regular makeup for face painting?
A2: While you can use some regular makeup for simple accents (like eyeliner for whiskers), it’s not recommended for full face painting. Face paints are specifically formulated to be non-toxic, hypoallergenic, and to spread smoothly and evenly on the skin. Regular makeup may not adhere well, can cake, or might cause skin irritation when applied in large quantities.
Q3: How long does face paint last?
A3: Properly applied water-based face paint can last several hours. For longer wear, especially in warm conditions or for active children, you can lightly dust the painted areas with a translucent setting powder. This helps to set the paint and prevent smudging.
Q4: How do I remove face paint if it’s stubborn?
A4: Start with warm water and mild soap. Gently lather and rinse. If some color remains, a baby wipe or a dedicated makeup remover can help lift the pigment. Avoid harsh scrubbing, which can irritate the skin.
Q5: My child is scared of having their face painted. What can I do?
A5: Start slow! Let your child see the paints and brushes. You can paint your own hand or arm first. Begin with a very simple design, like just a nose and whiskers, and ask them if they’d like more. Offer choices (e.g., “Would you like black whiskers or white whiskers?”). A positive and relaxed attitude from you will also help them feel more at ease.
Conclusion: Unleash Your Inner Feline!
Mastering how to cat face paint is a fun and rewarding skill. Whether you’re creating a simple cat face design for a toddler or a more elaborate beginner cat face makeup look for a costume party, the key is to use safe materials, plan your design, and practice your strokes. With this comprehensive guide, you have all the information needed to transform yourself or others into charming felines. So gather your cat face paint kit, grab your brushes, and get ready to paint! It’s a fantastic way to add a touch of magic and creativity to any occasion. Enjoy the process, and don’t be afraid to experiment with different animal face painting ideas as your confidence grows!