
Yes, you can get cat scratches out of leather, and it often depends on the depth of the scratch and the type of leather. Minor, surface-level cat claw marks can often be successfully repaired with simple, at-home methods. For deeper gouges, you might need professional leather repair or specialized products. This guide will walk you through how to tackle those frustrating cat scratch marks and restore your beloved leather items.
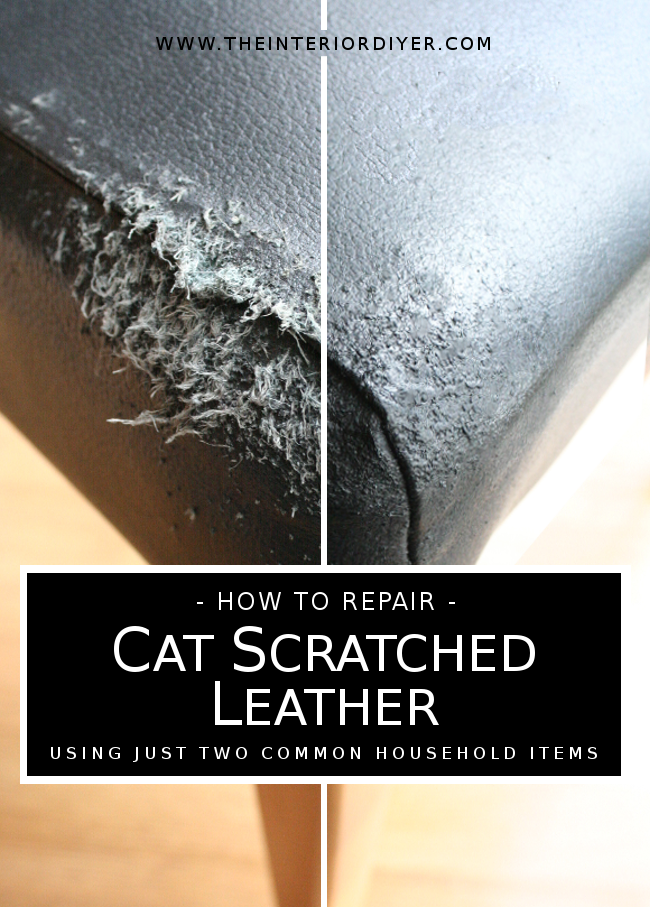
Image Source: 44.201.78.168
Dealing with Pet Damage Leather: Your First Steps
When you discover those unwelcome cat claw marks on your prized leather furniture, it’s easy to panic. However, a calm and methodical approach is key to successful pet damage leather repair. Before you grab any cleaning supplies, take a deep breath and assess the damage.
Assessing the Scratch Depth
The first crucial step in removing cat scratches is to determine how deep the damage goes.
- Surface Scratches: These are light marks that haven’t penetrated the leather’s top coat or dye. They might look like faint lines or scuffs. These are the easiest to fix.
- Medium Scratches: These go a bit deeper, potentially removing some of the color or topcoat. You might see the underlying material peeking through.
- Deep Scratches/Gouges: These have cut into the leather’s fibers. You’ll see significant damage, perhaps even a tear. These are the most challenging to repair at home.
Identifying Your Leather Type
Different leather types react differently to repair methods. Knowing your leather is vital for choosing the right approach for leather scratch removal.
- Aniline Leather: This is natural, dyed leather with minimal surface treatment. It’s very soft and beautiful but also prone to scratching and staining. Repairs need to be gentle.
- Semi-Aniline Leather: This has a thin protective coating, offering more durability than aniline. It’s a good balance of natural look and protection.
- Pigmented Leather (Finished Leather): This has a thicker protective coating with pigments that provide a uniform color. It’s the most durable and easiest to clean and repair. Most car seats and many modern furniture pieces are made of this.
- Nubuck/Suede: These have a napped surface and are very delicate. Cat scratches on these can be particularly difficult to remove without altering the texture. Specialized products are usually needed.
How to test your leather: A simple way to check is by placing a small drop of water on an inconspicuous area. If it soaks in quickly, it’s likely aniline or semi-aniline. If it beads up and sits on the surface, it’s probably pigmented leather.
Simple Solutions for Minor Cat Scratches
For those frustrating but not devastating cat claw marks, several DIY methods can work wonders for leather furniture repair. These methods often involve moisturizing and buffing the leather.
The Olive Oil or Coconut Oil Method
This is a popular and often effective method for very light scratches on finished leather. The oil helps to moisturize the leather and can blend the scratch, making it less noticeable.
What you’ll need:
- A clean, soft microfiber cloth
- A small amount of olive oil or coconut oil
Steps:
- Clean the Area: Gently wipe down the scratched area with a damp cloth to remove any dust or debris. Let it dry completely.
- Apply a Tiny Amount of Oil: Put a very small amount of olive oil or coconut oil onto your microfiber cloth. You don’t want to saturate the leather.
- Gently Rub: Using a circular motion, gently rub the oil into the scratch. Work from the outside of the scratch inwards. The idea is to blend the oils into the surrounding leather.
- Buff: Use a clean part of the cloth to gently buff the area. This helps to spread the oil evenly and restore the sheen.
- Observe: Let the leather sit for a few hours, or even overnight. The oil needs time to penetrate and work its magic. You may see the scratch become less visible as the leather absorbs the oil.
- Repeat if Necessary: For persistent light scratches, you might need to repeat this process a few times.
Important Note: This method works best on darker, finished leathers. On very light or natural leathers, oil can sometimes cause darkening or staining. Always test in an inconspicuous area first!
The Leather Balm or Conditioner Method
Specialized leather conditioning products are designed to nourish and protect leather, and they can also help to minimize the appearance of light scratches.
What you’ll need:
- A high-quality leather balm or conditioner suitable for your leather type
- A clean, soft microfiber cloth
Steps:
- Clean the Leather: Ensure the scratched area is clean and dry.
- Apply Conditioner to Cloth: Apply a small amount of leather balm or conditioner to your microfiber cloth.
- Massage into Scratch: Gently rub the conditioner into the scratched area using a circular motion. Focus on working it into the scratch itself and blending it into the surrounding leather.
- Allow to Penetrate: Let the conditioner sit for the time recommended on the product’s instructions, usually 10-20 minutes. This allows it to moisturize and condition the leather.
- Buff Gently: Use a clean, dry part of the cloth to gently buff the area. This will remove any excess conditioner and restore the natural shine.
- Evaluate: Check the scratch. Often, the conditioning will plump up the leather fibers and make the scratch much less noticeable.
Why it works: Leather conditioners contain oils and waxes that help to rehydrate and protect the leather. This can make minor abrasions less apparent by restoring suppleness and blending the surface.
The Hair Dryer and Damp Cloth Trick (for very superficial scratches)
This method is best for surface scratches on finished leather where the color hasn’t been removed. It works by using gentle heat and moisture to help the leather fibers relax and return to their original position.
What you’ll need:
- A soft, damp cloth (not soaking wet)
- A hairdryer
Steps:
- Dampen the Scratch: Gently dab the scratch with the damp cloth. You want the area to be slightly moist, not wet.
- Apply Gentle Heat: Hold the hairdryer on a low heat setting and a medium speed. Keep it moving and about 6-8 inches away from the leather.
- Wave and Watch: Gently wave the hairdryer back and forth over the damp area. As the leather warms, the fibers may relax, and the scratch might seem to disappear or become less visible.
- Allow to Cool: Let the leather cool down completely.
- Buff: Once cool, gently buff the area with a dry microfiber cloth.
Caution: This method requires a gentle hand. Too much heat can damage the leather. Always use the lowest heat setting and keep the dryer moving. It’s a good idea to test this on an inconspicuous spot first.
Tackling Deeper Cat Scratches: Intermediate Solutions
When cat claw marks have gone beyond the surface, you’ll need slightly more robust solutions. These often involve color restoration and filling.
Using Leather Filler or Repair Kits
For medium to deep scratches where the color is missing or the leather is gouged, a leather repair kit or specialized filler is often the best option for leather scratch removal. These kits are designed to fill in the damaged areas and then be colored to match your leather.
What you’ll need:
- A leather repair kit (available at craft stores or online) suitable for your leather type and color
- Fine-grit sandpaper (optional, and only for specific kits)
- A small spatula or applicator tool
- A clean cloth
- A hairdryer (sometimes used to speed up drying)
Steps (general guidance – always follow your specific kit’s instructions):
- Clean the Area Thoroughly: This is crucial for good adhesion. Clean the scratched area and the surrounding leather with a leather cleaner. Let it dry completely.
- Prepare the Scratch (if needed): Some kits recommend gently sanding the edges of a deep scratch to make them smoother for filler application. Use a very fine grit sandpaper and be extremely gentle. Wipe away any dust.
- Apply Leather Filler: Using the provided spatula, carefully apply a thin layer of the leather filler into the scratch. Work it in to ensure it fills the entire depth of the gouge. Avoid applying too much.
- Level the Filler: Smooth the filler so it’s as level as possible with the surrounding leather. You might need to build up thin layers if the scratch is deep, allowing each layer to dry.
- Dry the Filler: Allow the filler to dry completely according to the kit’s instructions. This might take several hours, or you can use a hairdryer on a low setting to speed it up.
- Sand Smooth (if needed): Once dry, if the filler is slightly raised, you can very gently sand it smooth with fine-grit sandpaper. Wipe away dust.
- Apply Colorant: This is the most critical step for a seamless repair. Most kits come with a colorant or dye. Apply thin coats of the colorant to the repaired area, blending it into the original leather. You may need multiple thin coats, allowing each to dry.
- Seal the Repair: Some kits include a sealant or topcoat. Apply this to protect the repaired area and match the sheen of the original leather.
Choosing the Right Kit: Look for kits specifically designed for leather furniture repair. Pay close attention to color matching. Many kits offer a base color and tinting dyes so you can mix your own shade.
Using Leather Dye for Color Restoration
If a scratch has removed the color but hasn’t significantly damaged the leather’s structure, you might be able to restore the color using a leather dye.
What you’ll need:
- Leather dye that matches your leather color
- A fine-tipped applicator (like a small brush or cotton swab)
- A clean cloth
- Leather cleaner
Steps:
- Clean the Area: Clean the scratched area and surrounding leather.
- Test the Dye: Always test the dye on an inconspicuous area of the leather to ensure an accurate color match and to see how it applies.
- Apply Dye Carefully: Dip your applicator into the dye and carefully apply it to the scratch. Start with a very small amount and build up the color gradually. Aim to fill the scratch itself and blend the edges slightly.
- Allow to Dry: Let the dye dry completely.
- Apply More Coats if Needed: If the color isn’t deep enough, apply another thin coat.
- Seal (Optional): Once dry, you can apply a leather sealant or conditioner to protect the dyed area.
Advanced Leather Scratch Repair and Professional Help
For very deep gouges, tears, or if you’re not confident in DIY repairs, professional upholstery repair services are your best bet.
Professional Leather Repair Services
Professionals have specialized tools, techniques, and a wider range of products to address severe pet damage leather. They can:
- Color-match precisely: For a seamless repair, matching the original leather color is vital.
- Repair tears and deep gouges: They can often use advanced fillers and bonding agents.
- Re-texture leather: For aniline or nubuck, they can sometimes help restore the original texture.
- Offer warranties: Many professional services offer guarantees on their work.
When to call a professional:
- Deep cuts that go through the leather.
- Tears or holes in the leather.
- Scratches on delicate leathers like aniline, nubuck, or suede.
- If you’ve tried DIY methods and they haven’t worked or made it worse.
- If the furniture is very valuable and you want a flawless finish.
Products for Specific Leather Types
It’s worth noting that specialized products exist for different leather types. For instance, leather balm for aniline might differ from a conditioner for pigmented leather. Always check product descriptions to ensure compatibility with your specific leather.
Preventing Future Cat Scratches
The best way to deal with cat scratches is to prevent them from happening in the first place. Here are some effective strategies for your pet damage leather concerns:
Provide Adequate Scratching Posts
Cats have a natural instinct to scratch. Providing them with appropriate scratching surfaces will redirect their behavior away from your furniture.
- Variety is Key: Offer different types of scratching posts – vertical, horizontal, cardboard, sisal rope, carpet.
- Placement Matters: Place scratching posts near your furniture and in areas where your cat spends a lot of time.
- Make them Appealing: Use catnip to encourage your cat to use the posts.
Trim Your Cat’s Claws Regularly
Regular claw trimming is one of the most effective ways to minimize damage.
- How Often: Aim to trim your cat’s claws every 2-4 weeks.
- Tools: Use sharp, cat-specific nail clippers.
- Technique: Only trim the very tip of the nail, avoiding the quick (the pink part of the nail that contains blood vessels and nerves). If you’re unsure, ask your vet or a groomer to show you how.
Use Furniture Covers or Throws
For vulnerable areas or during periods when your cat is more prone to scratching, consider using protective covers.
- Material: Choose durable fabrics that cats are less likely to snag.
- Coverage: Focus on corners and arms of sofas and chairs where cats often target.
Apply Scratch-Resistant Protectors
There are various products designed to deter cats from scratching furniture.
- Double-Sided Tape: Many cats dislike the sticky sensation and will avoid it.
- Scratch Guards: Clear, vinyl sheets that can be applied to furniture corners.
- Sprays: Some sprays have scents that cats find unpleasant and can deter them.
Positive Reinforcement
Reward your cat when they use their scratching posts. Praise and treats can go a long way in reinforcing good behavior.
Frequently Asked Questions About Cat Scratches on Leather
Q1: Can I use baby wipes to clean cat scratches from leather?
A1: It’s generally not recommended. Baby wipes can contain chemicals that might be too harsh or drying for leather, potentially causing further damage or discoloration. Stick to specialized leather cleaners or a very mild, damp cloth for initial cleaning.
Q2: My leather couch has many fine cat scratches. What’s the best approach?
A2: For numerous fine scratches, a good quality leather balm or conditioner is often the most effective first step. Apply it with a soft cloth in a circular motion to moisturize the leather and blend the scratches. Repeat as needed.
Q3: How do I know if a scratch is too deep for me to fix?
A3: If the scratch has gone through the colored topcoat and you can see the raw leather fibers or a different color underneath, or if there’s a tear or hole, it’s likely too deep for basic DIY methods. These situations often require professional leather repair or specialized leather scratch removal kits with fillers.
Q4: Will polishing compound work on cat scratches?
A4: While polishing compounds are designed for buffing out minor imperfections, they can be too abrasive for leather, especially delicate types. They might remove the protective coating or even the color. It’s safer to stick to products specifically formulated for leather furniture repair.
Q5: My cat scratched my aniline leather. What should I do?
A5: Aniline leather is very sensitive. For light scratches, try the leather balm or a very mild oil like olive oil, but test it on an inconspicuous spot first. For deeper scratches, professional upholstery repair is highly recommended, as incorrect methods can easily damage this type of leather permanently.
By following these steps and using the right products, you can effectively tackle cat claw marks and keep your leather items looking their best. Remember, patience and the right technique are key to successful leather scratch removal.